Search this blog ...

Thursday, August 22, 2013

Synology Remote Shutdown Poweroff BusyBox

Being the energy conserving environmentalist I am (read – tightass) I look for ways to reduce unnecessary power consumption. I have quite a few devices that are plugged in 24x7, but get limited use.  This includes my HTPC setup that comprises a Mac Mini i5 (bootcamp Windows 8) and a Synology DS413j NAS.  In the previous blog post I outlined costs involved in running the Synology DS413j.  The DS413j does not support system hibernation, only disk hibernation.  From my testing, it pulls about 11w continuous when the hard disk was hibernated.  In the grand scheme of things, this is not a big deal.

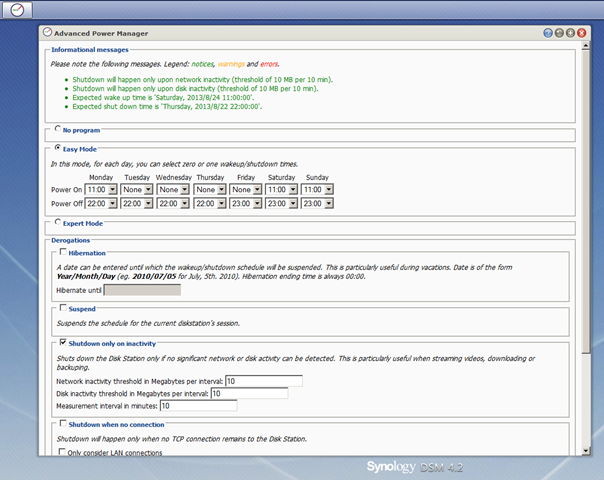
So what can be done to reduce power consumption?  Synology supports scheduled power-on / power-off events through their DSM.  There is also the very useful Advanced Power Manager package that takes this a step further by preventing the shutdown whilst any detected network/disk activity is above a specific threshold.  This way, if you are a watching a movie and midway reach the scheduled power-off time, the NAS won’t shutdown until such time disk/network activity falls below the configured threshold.

Advanced Power Manager

In the screenshot above, I have configured Power Off times for every day of the week, but not necessarily power on times.  This means the NAS will always shutdown at night if running, but not necessarily start again in the morning automatically.

Whilst the above package is great, I wanted to go a step further and support remote shutdown of the NAS triggered by a desktop shortcut and/or remote control event.  In my HTPC setup, I’m using EventGhost to coordinate infrared remote control events to specific actions. I leverage the On Screen Menu EventGhost plugin capability to display a menu of options rendered on my (television) screen for interacting with the HTPC.  This includes launching XBMC, Suspending and Shutting down the Mac Mini, Sending a Wake On Lan packet to the Synology.  I want to add a new option to this menu to shutdown the NAS.

One would think remote shutdown is pretty simple.  In fact it can be very simple, by simply Enabling SSH on the NAS, and then leveraging something like putty to make a “root” user connection to the NAS supplying a  “Remote command” option like the following

image

You would simply save the putty session as some specific name (e.g root-shutdown), then trigger it using a shortcut link such "C:\Program Files (x86)\PuTTY\PUTTY.EXE" -load "root-shutdown"

But what if you want to grant the ability to power off the NAS to some non-root user?  Would it not be great to have some user, say the fictitious user “netshutdown”, who simply by connecting to the NAS through telnet / SSH would result in the NAS shutting down?

This would be easily accomplished using something like sudo whereby administration commands can easily be delegated.  However “sudo” is not available in the standard DSM 4.2 install on the DS413j.  Simple then, lets leverage suid on the poweroff executable so that it runs as root.  However, the poweroff executable is actually a symbolic link to /bin/busybox.  Setting suid on busybox also makes no difference:

image

Setting suid on busybox does however allow “su” to function from a non-root user.

image

I’m not comfortable setting suid on the busybox executable given pretty much every command in /bin and a number from /sbin are linked to it.  One extreme word of caution!!! Do not make the mistake of executing chmod a-x on the busybox executable or anything linked to it!  You will hose your system.  I was extremely lucky to have perl installed on my NAS, and had not logged out from my root session, and was able to leverage perl’s chmod function to restore pemissions! (what a relief)

image

If you search for busybox, poweroff, and suid, you find a number of results that talk about employing techniques such as /etc/busybox.conf to call out specific applets and whom can run them, creating c wrapper programs that leverage execve to call busybox, or setuid and system to call /sbin/poweroff etc.  I tried all of these and none of them worked with the compiled busybox executable on my NAS; I would receive the Permission denied / Operation not permitted errors.

Finally however, I cracked it.

I created a wrapper program that rather than call /sbin/poweroff, calls a shell script owned by root, which in turn triggers poweroff.

The program (shutdown.c) is as follows:

#include <stdio.h>     /* printf function */
#include <stdlib.h>    /* system function */
#include <sys/types.h> /* uid_t type used by setuid */
#include <unistd.h>    /* setuid function */

int main()
{
  printf("Invoking /bin/shutdown.sh ...\n");
  setuid(0);
  system("/bin/shutdown.sh" );
  return 0;
}

/bin/shutdown.sh is as follows:
echo Triggering poweroff command
/sbin/poweroff

I followed the developer guide to determine how to compile c programs specific for the NAS.  In the case of the DS413j, It leverages a Marvell Kirkwood mv6282 ARMv5te CPU.  So I needed to leverage the toolchain for Marvell 88F628x.

As I had no native/physical linux machine available for the compilation, I decided to use VirtualBox on Windows and download / leverage the Lubuntu 12.10 VirtualBox image which is a lightweight version of Ubuntu.  I set the network card to bridged, started the image, authenticated as lubuntu/lubuntu and updated/added some core packages:

sudo apt-get update
sudo apt-get install build-essential dkms gcc make
sudo apt-get install linux-headers-$(uname -r)

sudo -s
cd /tmp
wget
http://sourceforge.net/projects/dsgpl/files/DSM%204.1%20Tool%20Chains/Marvell%2088F628x%20Linux%202.6.32/gcc421_glibc25_88f6281-GPL.tgz
tar zxpf gcc421_glibc25_88f6281-GPL.tgz -C /usr/local/

cat > /tmp/shutdown.c <<EOF
#include <stdio.h>     /* printf function */
#include <stdlib.h>    /* system function */
#include <sys/types.h> /* uid_t type used by setuid */
#include <unistd.h>    /* setuid function */

int main()
{
  printf("Invoking /bin/shutdown.sh ...\n");
  setuid(0);
  system("/bin/shutdown.sh" );
  return 0;
}
EOF

/usr/local/arm-none-linux-gnueabi/bin/arm-none-linux-gnueabi-gcc shutdown.c -o shutdown

lubuntu@lubuntu-VirtualBox:/tmp$ /usr/local/arm-none-linux-gnueabi/bin/arm-none-linux-gnueabi-gcc shutdown.c -o shutdown
lubuntu@lubuntu-VirtualBox:/tmp$ ls -ltr
total 16
-rw-rw-r-- 1 lubuntu lubuntu  308 Aug 22 01:29 shutdown.c
-rwxrwxr-x 1 lubuntu lubuntu 6715 Aug 22 01:29 shutdown
lubuntu@lubuntu-VirtualBox:/tmp$

Now that the shutdown executable was created, I uploaded it to the NAS to the /bin directory. 

Next I needed the user/group account infrastructure in place on the NAS in order to trigger it.  I created a user named “netshutdown” and a group named “shutdown” using the DiskStation Web UI Control Panel User/Group widgets.  I also made sure the SSH service was enabled (Control Panel > (Network Services >) Terminal > Enable SSH Service).

If you try and SSH leveraging username/password authentication to the NAS as the newly created user, you will see that you are not presented with a shell.  This is because Synology locks the user down, which can be seen by viewing the passwd file connected as root:

media> cat /etc/passwd
root:x:0:0:root:/root:/bin/ash
lp:x:4:7:lp:/var/spool/lpd:/sbin/nologin
ftp:x:21:21:Anonymous FTP User:/nonexist:/sbin/nologin
anonymous:x:21:21:Anonymous FTP User:/nonexist:/sbin/nologin
smmsp:x:25:25:Sendmail Submission User:/var/spool/clientmqueue:/sbin/nologin
postfix:x:125:125:Postfix User:/nonexist:/sbin/nologin
dovecot:x:143:143:Dovecot User:/nonexist:/sbin/nologin
spamfilter:x:783:1023:Spamassassin User:/var/spool/postfix:/sbin/nologin
nobody:x:1023:1023:nobody:/home:/sbin/nologin
admin:x:1024:100:System default user:/var/services/homes/admin:/bin/sh
guest:x:1025:100:Guest:/nonexist:/bin/sh
mshannon:x:1026:100::/var/services/homes/mshannon:/sbin/nologin
netshutdown:x:1027:100::/var/services/homes/netshutdown:/sbin/nologin

Notice the netshutdown user has the shell set as “/sbin/nologin”, and the home directory set to “/var/services/homes/netshudown”.  There is no such “homes” directory on my instance.

I edited /etc/passwd and changed
netshutdown:x:1027:100::/var/services/homes/netshutdown:/sbin/nologin
to
netshutdown:x:1027:65536::/home/netshutdown:/bin/sh

65536 is the group id of the new shutdown group:

media> cat /etc/group
#$_@GID__INDEX@_$65536$
root:x:0:
lp:x:7:lp
ftp:x:21:ftp
smmsp:x:25:admin,smmsp
users:x:100:
administrators:x:101:admin
postfix:x:125:postfix
maildrop:x:126:
dovecot:x:143:dovecot
nobody:x:1023:
shutdown:x:65536:netshutdown

I then created the home directory for the user:
mkdir -p /home/netshutdown
chown netshutdown /home/netshutdown

Test it out …

media> su - netshutdown

BusyBox v1.16.1 (2013-04-16 20:15:54 CST) built-in shell (ash)
Enter 'help' for a list of built-in commands.

media> pwd
/home/netshutdown

My user/group was now in place, so it was time to set permissions and configure the shutdown executable and shell script :-

cd /bin
chown root.shutdown shutdown
chmod 4750 shutdown

media> ls -la shutdown*
-rwsr-x---    1 root     shutdown      6715 Aug 22 09:31 shutdown

cat > /bin/shutdown.sh <<EOF
echo Triggering poweroff command
/sbin/poweroff
EOF

media> ls -la shutdown.sh
-rw-r--r--    1 root     root            48 Aug 22 09:35 shutdown.sh

chmod 700 shutdown.sh

media> ls -la shutdown*
-rwsr-x---    1 root     shutdown      6715 Aug 22 09:31 shutdown
-rwx------    1 root     root            48 Aug 22 09:35 shutdown.sh

For the netshutdown user to automatically trigger the shutdown executable on connection, I had a few different options:

Option 1) Change the user’s login shell from /bin/sh to be /bin/shutdown
Option 2) Create a .profile file for the user, and trigger the /bin/shutdown command from the user’s .profile

I decided on the latter.

echo "/bin/shutdown" > /home/netshutdown/.profile
chown netshutdown /home/netshutdown/.profile

Now it was time to test the power off …

image

At this stage, we can now easily create a new putty session that connects via SSH as user netshutdown with username/password authentication.  We can invoke that saved session using a shortcut such as PUTTY.EXE -load "XXX Sesion Name”.

If you are a sucker for punishment, you can make this thing a bit more complex by utilizing public key authentication (rather than username/password).  In the most simple form, you leverage a tool such as puttygen.exe to generate a keypair (private key and public certificate) for a particular user.  You enable public key authentication on your NAS, and upload the public certificate of the user to the NAS. You then configure putty to authenticate using public key authentication and point it to the location of your private key.  You can go a step further by encrypting your private key so that a passphrase must be supplied on login in order to extract the private key and authenticate.  You can also utilize the Putty Authentication Agent (Pageant) to store the decrypted private key in memory, and have putty sessions consult Pageant for the private key on authentication.  This blog post does a good job of describing the options.

To get public key authentication up and running quickly on your NAS follow steps similar to the following :

1) Run puttygen.exe
2) Generate new SSH-2 RSA Key without a keyphrase
3) Save public key and private key to files (e.g publickey.txt and privatekey.ppk)
4) (This should have already been done) From Synology DiskStation UI, Go to Control Panel > (Network Services >) Terminal > Enable SSH Service

5) Next SSH using putty.exe to the NAS as the root user

6) Edit /etc/ssh/sshd_config

uncomment the following two lines
#PubkeyAuthentication yes
#AuthorizedKeysFile     .ssh/authorized_keys

and save the file

7) Connect as the end-user concerned, and create ~/.ssh directory, and create the file ~/.ssh.ssh/authorized_keys

8) Add the public key text from above in to the authorized_keys file and save it ...

ssh-rsa AAAAB3Nza......== ....

9) Change the permissions
chmod 700 ~/.ssh
chmod 644 ~/.ssh/authorized_keys

10) Open Putty and make the following changes to the session ...

Connection type: SSH
Connection->Data->Auto-login username: netshutdown
Connection->SSH->Auth->Private Key: Your Private Keyfile from above

11) Save the session - e.g. netshutdown-media-nas

12) Create a new shortcut on your desktop with the following target "C:\Program Files\PuTTY\putty.exe" -load "netshutdown-media-nas"

Notes - The private key above contains no passphrase, and is essentially equivalent to having a password in clear text stored in a text file on the desktop.  Where security is required, configure the private key with a passphrase.  You can then run/utilize Pageant to store effectively the unencrypted private key in memory by supplying the encryption passphrase; this then prevents the continuous password prompting on establishing each new session.
Synology DS413J Power Consumption

I just purchased the entry level Synology DS413j to use for my HTPC media storage.  It is running DSM 4.2 3211  The Synology specs state that in HDD hibernation mode, the DS413j should use 7.68 watts.  From my testing using an Arlec 240v power meter with just a single 3TB Western Red WD30EFRX installed, the Synology was reading 15w when running, and 11w after HDD hibernation kicked in due to 20 minute disk inactivity.  I’m a little annoyed that it is not performing at the advertised 7.68 watts – that is about $6 per year in energy at my tariff of 21.351 cents/kWH.  I imagine in order to get that value, Synology must have stripped the NAS down to the bare services required. 

The DS413 model supposedly can do full system hibernation and drop to 3.37w.  If your NAS will 99% of the time be idle, but powered on 24x7, and assuming the 21.351 cents/kWH tariff value from above, you are looking at $6.30 per year to run the DS413 at 3.37w versus $20.57 for the DS413J at 11w:

DS413J with only HDD hibernation –> 365 days per year * 24 hours per day * .011 KW * .21351 $/kWH (Origin Energy) = $20.57 per year to run.

DS413 with system hibernation –> 365 days per year * 24 hours per day * .00337 KW * .21351 $/kWH (Origin Energy) = $6.30 per year to run.

Thus, I could save $14 in a year, by purchasing the DS413 over the DS413J.

DS413j = $365 ; DS413 = $519.    (519 – 365) / 14 = 11.   It would take 11 years for the DS413 to pay for itself on energy savings assuming I never use the NAS :)

If on the other hand, you are actively using the NAS 24x7 and fully loaded with 4 disks, you are looking at around 35w for both DS413 and DS413J.

365 days per year * 24 hours per day * .035 KW * .21351 $/kWH (Origin Energy) = $65.46 per year to run.

Thursday, May 16, 2013

Unused CSS rules - Optimize HTML pages by removing unreferenced CSS - for free!

Google provides some very useful tools and services that can be leveraged to audit web page performance and thus assist in optimizing HTML pages.  However these do have their warts.

Page Speed for example provides a free online audit check, as well as Firefox and Chrome browser plugins that can be leveraged to analyse a web page’s performance and assist with optimization.  There are two drawbacks with these tools/service

  1. The HTML file must be hosted on a HTTP server and a local file cannot be utilized.  Otherwise a message such as the following will occur “Unable to run PageSpeed Insights on file:///C:/Users/mshannon/Desktop/test2.html. Please navigate to a HTTP(s) web page.”
  2. The browser extensions can be used to “minify” both the HTML and CSS (by removing whitespace / formatting etc), but do not seem to accurately be able to detect unreferenced CSS

My solution to the hosted HTML files was to piggyback on dropbox.  I created myself a public folder in my dropbox account and uploaded the html and css files.  I then right-clicked on the uploaded files and obtained a public link (for example .. https://dl.dropboxusercontent.com/u/12345/test2.html)

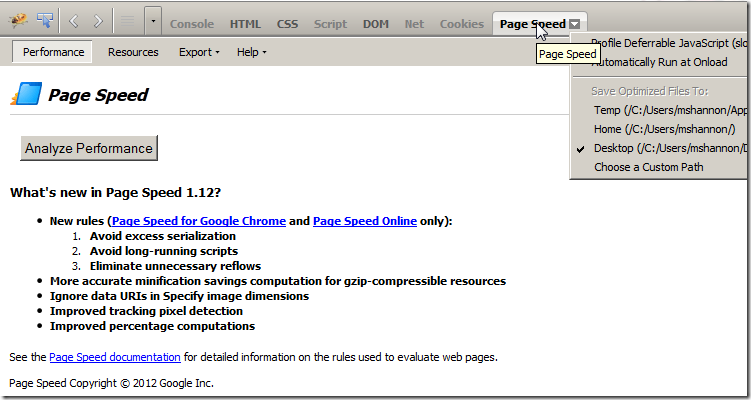
Once I had the hosted HTML files, I could leverage the Page Speed service and utilize the browser developer tools.  The firefox Page Speed extension provides an addon to Firebug.  You can see in the image below it has an option to save optimized files to a local location.

image

I leveraged the Firefox Page Speed extension purely to get the cleaned/formatted html and css files.

What was left now to perform was to remove the unreferenced CSS rules.

Google chrome bundles a useful (crippled) developer tool that can be leveraged to audit web page performance and identify unused CSS rules.   Unlike Page Speed, this particular tool does a great job of identifying unreferenced rules.  It is accessed from Chrome through the following menu/popup combination: Tools > Developer Tools > Audits > Web Page Performance > Run

image

You can see by running the tool below, it found a huge number of unreferenced rules:

image

The problem with this tool however, is that it does not provide a mechanism to write out the good (referenced/used) CSS rules.

A bit of searching around, and I found this excellent post:

http://dev.bootstraponline.com/2011/11/automatically-remove-unused-css-rules.html

Essentially, the dude had patched the chrome developer tools to write out the good css rules when running the audit.  The problem for me though, was this was done using Linux builds, and also I wasn’t sure whether newer builds of chrome would offer better detection capabilities.

So I set about getting the latest windows chrome builds from http://commondatastorage.googleapis.com/chromium-browser-continuous/index.html

What I found however, is that they stopped shipping devtools_frontend.zip at build 158804. At the time of writing this, they were now up to build 200347.  Additionally, the contents of devtools_frontend.zip with build 158804 did not seem to match the files that boostraponline referenced in his/her patch.  So I went trawling backwards in builds until I found the very last version to ship with AuditRules.js inside devtools_frontend.zip.  This was build 152197 which is circa August 2012.

You need the following two files:

http://commondatastorage.googleapis.com/chromium-browser-continuous/Win/152197/chrome-win32.zip

http://commondatastorage.googleapis.com/chromium-browser-continuous/Win/152197/devtools_frontend.zip

Next …

  1. extract build 152197 of chrome-win32.zip (e.g. to desktop) ; this automatically creates a folder named "chrome-win32"
  2. extract build 152197 of devtools_frontend.zip to a *new* folder named "devtools_frontend" under "chrome-win32"; the "devtools_frontend" folder needs to be created
  3. create a new folder named "user-data" under "chrome-win32"
  4. create a run.bat file to trigger execution of chrome similar to the following:

@echo off
set CHROMEDIR=C:\Users\mshannon\Desktop\chrome-win32
%CHROMEDIR%\chrome.exe --user-data-dir=%CHROMEDIR%\user-data --debug-devtools-frontend=%CHROMEDIR%\devtools_frontend

Execute the bat file and see if chrome successfully loads.  Once confirmed, close down chrome.

The patch diff that bootstraponline provides is mostly accurate.  The one change though is you must now utilize “InspectorFrontendHost.save("used.css", usedCss, true);”

You can download the patched AuditRules.js file for the above build 152197 from my dropbox: http://db.tt/5ZUFkIqX

Simple replace devtools_frontend\AuditRules.js with the file above.

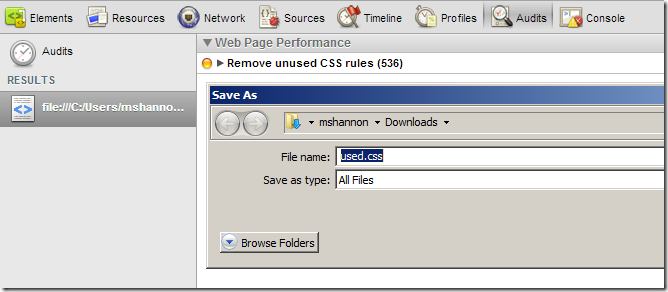
Having performed the patch, fire up chrome from the bat file.  Invoke the audit tool against the web page (or local file) and you will be presented with a save-as box should it detect unreferenced CSS rules. The file to be saved (used.css) contains the rules that were referenced.

image

Thanks bootstraponline and Google!

Saturday, April 13, 2013

Recover / Decrypt Weblogic password from boot.properties

When installing a Weblogic domain in development mode, the Configuration wizard will generate a boot identity file for the administration server containing the encrypted username and password of the initial administrative user. These credentials are then automatically leveraged when starting the admin server and avoid the need for the weblogic administrator to manually supply these. It is also possible to utilize a boot identify file (boot.properties) in production domains.    See the following link for more information: http://docs.oracle.com/cd/E14571_01/web.1111/e13708/overview.htm#i1068887

Recovering/decrypting a credential value from the boot identity file is reasonably straightforward should you have shell and executable access to the Weblogic installation.

First, obtain the DOMAIN_HOME value …

ps auxwww | grep Name=AdminServer | tr " " "\n" | grep "domain.home"

-Ddomain.home=/u01/app/oracle/product/Middleware/user_projects/domains/base_domain

Next, source the setDomainEnv.sh file …

export DOMAIN_HOME=/u01/app/oracle/product/Middleware/user_projects/domains/base_domain

source $DOMAIN_HOME/bin/setDomainEnv.sh

Extract the encrypted username and password credential from the boot identify file ...

USR=`grep username $DOMAIN_HOME/servers/AdminServer/security/boot.properties | sed -e "s/^username=\(.*\)/\1/"`

PW=`grep password $DOMAIN_HOME/servers/AdminServer/security/boot.properties | sed -e "s/^password=\(.*\)/\1/"`

Sample values …

mshannon@slc05elc% echo $USR
{AES}RI+L8BLQQc3mTwbCx59un+vcHJ4c30GMQ90ovDY7VLI=

mshannon@slc05elc% echo $PW
{AES}B9acQuaVUBNqsem1FzGROqu7w2tqZenm3StwYB3C+bM=

Create the small java Decrypt program and invoke it supplying the DOMAIN_HOME and encrypted value requiring decryption …

cat > /tmp/Decrypt.java <<EOF
public class Decrypt {
  public static void main(String[] args) {
    System.out.println("Decrypted value: " + new weblogic.security.internal.encryption.ClearOrEncryptedService(
      weblogic.security.internal.SerializedSystemIni.getEncryptionService(args[0])).
        decrypt(args[1]));
  }
}
EOF

$JAVA_HOME/bin/javac -d /tmp /tmp/Decrypt.java

$JAVA_HOME/bin/java -cp /tmp:$CLASSPATH Decrypt "$DOMAIN_HOME" "$USR"

$JAVA_HOME/bin/java -cp /tmp:$CLASSPATH Decrypt "$DOMAIN_HOME" "$PW"

Sample output … 

mshannon@slc05elc% $JAVA_HOME/bin/java -cp /tmp:$CLASSPATH Decrypt "$DOMAIN_HOME" "$USR"
Decrypted value: weblogic

mshannon@slc05elc% $JAVA_HOME/bin/java -cp /tmp:$CLASSPATH Decrypt "$DOMAIN_HOME" "$PW"
Decrypted value: welcome1

Wednesday, March 27, 2013

Simple Chrome black background dark theme extension - How to build one in 5 minutes

There are times when a white background is best replaced with a black one.  If you are using Chrome, you can build your own custom extension in just a few minutes that can easily modify colours of your favourite website(s). To do this, we leverage the Content Scripts feature available to Chrome Extensions that is kind of like a poor man’s version of GreaseMonkey.  Best of all though, there are no closed custom 3rd party Chrome extensions to install from some unknown developer, here you will be the developer!

Content Scripts provide a mechanism to manipulate the DOM. The DOM is essentially a tree of all objects that constitute the webpage (images / links / text / styles etc).

What we are going to do is create an unpacked extension that simply adds a new stylesheet link at the end of the page load which will change the background colour to black, and the text/link/visited-link colours to various shades of grey. For our test, we will modify all pages falling under cnn.com and yahoo.com.

To get started, first create yourself a folder (on your Desktop or wherever) that will host the two files that comprise our extension, for example "Black Background Extension"

Within this folder, create a file named toggle.js that has the following contents:

var cssStyle='* { background: black !important; color: #EEEEEE !important }'
+ ' :link, :link * { color: #A1A1A1 !important }'
+ ' :visited, :visited * { color: #505050 !important }';

if(document.createStyleSheet) {
  document.createStyleSheet("javascript:'"+cssStyle+"'");
} else {
  var cssLink = document.createElement('link');
  cssLink.rel = 'stylesheet';
  cssLink.href = 'data:text/css,'+escape(cssStyle);
  document.getElementsByTagName("head")[0].appendChild(cssLink);
}

Next, create a file named manifest.json that has the following contents:

{
  "name": "Black Background",
  "version": "1.0",
  "description": "Sets background colour to black, and text, link, and visited link to shades of grey",
  "manifest_version": 2,
  "content_scripts": [
    {
      "matches": ["http://*.cnn.com/*", "http://*.yahoo.com/*"],
      "js": ["toggle.js"],
      "run_at": "document_end",
      "all_frames": true
    }
  ]
}

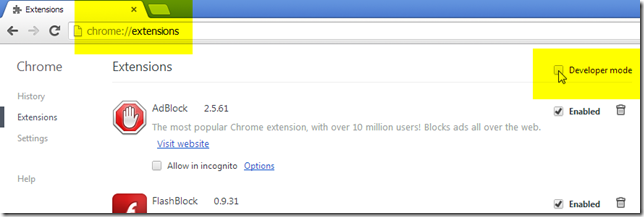
Now, it is a simple matter of firing up Chrome, and typing in chrome://extensions in the address bar. Once the Extensions are displayed, activate the Developer mode option.

image

Next, choose the Load unpacked extension… button and navigate to the folder created above hosting our unpacked extension.

image

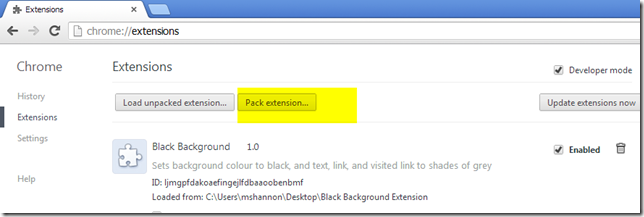
If all goes to plan, our extension should now be listed.  We also have the option of packing our extension in to a signed zip file that would allow us to redistribute it.

image

Finally, simply restart the Chrome browser and attempt to access a site from our match rules (cnn.com for example).  You should see that the background colour is now black!

image

For details on the content_scripts options leveraged in our manifest, refer to the Chrome documentation http://developer.chrome.com/extensions/content_scripts.html


Wednesday, March 20, 2013

How to determine if an Oracle LOB is stored as a SECUREFILE or BASICFILE

The DESCRIBE command on an Oracle table is not sufficient to determine whether a LOB column is stored as a SECUREFILE or a regular old BASICFILE. Instead you must query USER_LOBS (or DBA_LOBS etc), or alternatively leverage the PL/SQL dbms_lob.issecurefile function.

% sqlplus

SQL*Plus: Release 11.2.0.1.0 Production on Tue Mar 19 18:04:53 2013

Copyright (c) 1982, 2009, Oracle.  All rights reserved.

Enter user-name: / as sysdba

Connected to:
Oracle Database 11g Enterprise Edition Release 11.2.0.1.0 - 64bit Production
With the Partitioning, OLAP, Data Mining and Real Application Testing options

SQL> show parameter compatible;

NAME                                 TYPE        VALUE
------------------------------------ ----------- ------------------------------
compatible                           string      11.2.0.0.0

SQL> show parameter db_securefile;

NAME                                 TYPE        VALUE
------------------------------------ ----------- ------------------------------
db_securefile                        string      PERMITTED


The DB_SECUREFILE parameter specifies whether or not to treat LOB files as SecureFiles by default.

NEVER - LOBs that are specified as SecureFiles are created as BasicFile LOBs. Any SecureFile-specific storage options specified will result in an exception.
PERMITTED - LOBs are allowed to be created as SecureFiles, but will be created as BasicFile by default.
ALWAYS - All LOBs created in the system are created as SecureFile LOBs.
IGNORE - The SECUREFILE keyword and all SecureFile options are ignored.

If the COMPATIBLE parameter is not set to 11.1 or higher, then LOBs are not treated as SecureFiles.


SQL> create user matt identified by welcome1;

User created.

SQL> grant create session to matt;

Grant succeeded.

SQL> grant create table to matt;

Grant succeeded.

SQL> grant unlimited tablespace to matt;

Grant succeeded.

SQL> conn matt/welcome1
Connected.

SQL>
CREATE TABLE test(
  lob1 BLOB
,lob2 BLOB
,lob3 BLOB
,lob4 BLOB
)
  LOB(lob2) STORE AS BASICFILE
,LOB(lob3) STORE AS SECUREFILE
,LOB(lob4) STORE AS SECUREFILE (
    ENABLE STORAGE IN ROW
    NOCACHE LOGGING
    COMPRESS MEDIUM
    DEDUPLICATE
  )
/

Table created.


Logging options:

LOGGING - LOB changes generate full entries in redo logs
NOLOGGING - LOB changes are not logged in the redo logs and cannot be replayed in the event of failure.

Caching options

CACHE - LOB data is placed in the buffer cache.
CACHE READS - LOB data is only placed in the buffer cache only during read operations but not during write operations.
NOCACHE - LOB data is not placed in the buffer cache, or brought in to the buffer cache and placed at the least recently used end of the LRU list.

SecureFile LOBs also support FILESYSTEM_LIKE_LOGGING logging option which is similar to metadata journaling of file systems


SQL> desc test;
Name                                      Null?    Type
----------------------------------------- -------- ----------------------------
LOB1                                               BLOB
LOB2                                               BLOB
LOB3                                               BLOB
LOB4                                               BLOB

SQL> desc user_lobs;
Name                                      Null?    Type
----------------------------------------- -------- ----------------------------
TABLE_NAME                                         VARCHAR2(30)
COLUMN_NAME                                        VARCHAR2(4000)
SEGMENT_NAME                                       VARCHAR2(30)
TABLESPACE_NAME                                    VARCHAR2(30)
INDEX_NAME                                         VARCHAR2(30)
CHUNK                                              NUMBER
PCTVERSION                                         NUMBER
RETENTION                                          NUMBER
FREEPOOLS                                          NUMBER
CACHE                                              VARCHAR2(10)
LOGGING                                            VARCHAR2(7)
ENCRYPT                                            VARCHAR2(4)
COMPRESSION                                        VARCHAR2(6)
DEDUPLICATION                                      VARCHAR2(15)
IN_ROW                                             VARCHAR2(3)
FORMAT                                             VARCHAR2(15)
PARTITIONED                                        VARCHAR2(3)
SECUREFILE                                         VARCHAR2(3)
SEGMENT_CREATED                                    VARCHAR2(3)


set linesize 100

col Column format a6
col isSecureFile format a12
col Compressed format a10
col DeDuplicated format a12
col Encrypted format a9
col StoredInRow format a11
col Logging format a7
col Cached format a10

SELECT
  column_name as "Column"
,securefile as "isSecureFile"
,compression as "Compressed"
,deduplication as "DeDuplicated"
,encrypt as "Encrypted"
,in_row as "StoredInRow"
,logging as "Logging"
,cache as "Cached"
FROM user_lobs
WHERE table_name = 'TEST'


Column isSecureFile Compressed DeDuplicated Encrypted StoredInRow Logging Cached
------ ------------ ---------- ------------ --------- ----------- ------- ----------
LOB1   NO           NONE       NONE         NONE      YES         YES     NO
LOB2   NO           NONE       NONE         NONE      YES         YES     NO
LOB3   YES          NO         NO           NO        YES         YES     NO
LOB4   YES          MEDIUM     LOB          NO        YES         YES     NO


SQL>

insert into test values(empty_blob(), empty_blob(), empty_blob(), empty_blob())

set serveroutput on

DECLARE
l1 BLOB; l2 BLOB; l3 BLOB; l4 BLOB;
BEGIN
  SELECT lob1, lob2, lob3, lob4
  INTO l1, l2, l3, l4
  FROM test
  WHERE rownum = 1;

  IF dbms_lob.issecurefile(l1) THEN
    dbms_output.put_line('Stored in a securefile');
  ELSE
    dbms_output.put_line('Not stored in a securefile');
  END IF;

  IF dbms_lob.issecurefile(l2) THEN
    dbms_output.put_line('Stored in a securefile');
  ELSE
    dbms_output.put_line('Not stored in a securefile');
  END IF;

  IF dbms_lob.issecurefile(l3) THEN
    dbms_output.put_line('Stored in a securefile');
  ELSE
    dbms_output.put_line('Not stored in a securefile');
  END IF;

  IF dbms_lob.issecurefile(l4) THEN
    dbms_output.put_line('Stored in a securefile');
  ELSE
    dbms_output.put_line('Not stored in a securefile');
  END IF;

END;
/


Not stored in a securefile
Stored in a securefile

PL/SQL procedure successfully completed.

Wednesday, March 6, 2013

Disable Adobe Reader XI (11.x) Welcome Screen


Create and execute a registry file (disablewelcomescreen.reg) with contents:

REGEDIT4

[HKEY_LOCAL_MACHINE\SOFTWARE\Policies\Adobe\Acrobat Reader\11.0\FeatureLockDown\cWelcomeScreen]
"bShowWelcomeScreen"=dword:00000000

Alternatively, open regedit and then navigate to Computer > HKEY_LOCAL_MACHINE > SOFTWARE > Policies > Adobe > Acrobat Reader > 11.0 > FeatureLockDown.

right click on FeatureLockDown and choose New > Key.

name the key cWelcomeScreen

right click the cWelcomeScreen key and choose New > DWORD (32-bit) Value

name the DWORD value bShowWelcomeScreen

leave the value as 0

Tuesday, February 26, 2013

xargs - is command executed once or multiple times – examples

xargs is used to execute a command one or potentially multiple times using the standard input as arguments to that command.

What sometimes in unclear is whether the command invoked by xargs is executed once or multiple times.

This blog post should clear things up …

Firstly, here is the xargs program usage in layman’s terms

xargs [xargs options] [command] [arguments for command based on xargs standard input]

The standard input would typically be output that was piped from an earlier command such as find / ls / echo etc.  It doesn’t have to be though, you can invoke xargs as a standalone no-arg command and simply type the input and terminate with a control-d to signal end-of-terminal.

Let’s try a simple example combining the xargs --verbose option so that we can see the command-line that xargs will execute on the standard error output before it is actually invoked. In the screenshot below, I invoke the xargs command, and then enter 1 to 5 separating each with a newline (enter), followed by a terminating ctrl-d.  As I provided the --verbose option to xargs, it wrote out the command that it will execute and the arguments that it is going to provide to that command.

image

The output above shows that be default if you don’t provide an explicit command for xargs to invoke, it will leverage /bin/echo. You can also see xargs invoked this echo command just a single time. What may not be obvious is how xargs processed the standard input to come up with arguments to supply the (in this case 'echo') command. xargs will by default treat whitespace and newlines as delimiters. In the example below, I entered: 1 TAB 2 NEWLINE 3 SPACE 4 NEWLINE 5 NEWLINE ctrl-d.

image

So how and under what conditions does the command that xargs executes get invoked multiple times?

Well.. you can either explicitly tell xargs that a particular command can only operate on a specific number of arguments at a time, and that the command should be reinvoked as required to work through the remaining arguments; OR … xargs may determine itself that the command to execute along with any arguments hits a maximum command-line length, in which case it automatically splits the arguments across multiple command invocations.

Let’s first explicitly tell xargs that a command invocation should only work on a maximum number of arguments at a time.  You do this through the -n option …

image

The above example first shows supplying a “-n1” option which results in a command being invocated for each argument. Later the “-n2” option is leveraged which result in a command being invoked for every two arguments. The final xargs test above shows how 1 TAB 2 NEWLINE 3 SPACE 4 NEWLINE 5 NEWLINE ctrl-d is processed with the “-n1” option.  You can see that xargs immediately starts invoking commands after each line of input is processed.

As mentioned prior, xargs may itself automatically split arguments across multiple commands if a maximum command-line character length is reached. The xargs binary will likely have a default size limit hardcoded to the operating system ARG_MAX length.

image

You can explicitly tell xargs the max command-line length using the --max-chars or -s options.  The length comprises the command and initial-arguments and the terminating nulls at the ends of the argument strings.  As seen below “/bin/echo 1” will take 12 chars, and “/bin/echo 1 2” will take 14 chars (including terminating null).

/bin/echo 1 2
12345678901234

Let’s try out this “-s” option…

image

Here is a final example that ties everything together.  It demonstrates the following:

  1. xargs receiving piped standard-input from a prior command (i.e tr / find).
  2. xargs using the --verbose option to output the command that will be invoked
  3. xargs being told to leverage an explicit delimiter “-d” option, e.g “\n” – newline
  4. xargs invoking an explicit command (the Unix “file” command)
  5. xargs invoking an explicit command once per argument (“-n1”)
  6. find command leveraging the “-print0” option to delimit search results by the null character (rather than newline), in conjunction with the “-0” (or --null) xargs option so that any search results which contain whitespace are treated correctly as a single command-argument.

image

image

Wednesday, February 6, 2013

Java Applet terminated in browser when debugging – solution

I recently had to troubleshoot an old applet that was not working as expected. I intended to leverage JDeveloper to debug the applet utilizing JPDA socket debug steps listed in: http://docs.oracle.com/javase/6/docs/technotes/guides/plugin/developer_guide/debugger.html

I was able to successfully connect/attach to the VM from JDeveloper and start stepping through code, however within a minute or so, the applet would unexpectedly terminate.  You can imagine how frustrating this was.  A quick search on google listed possible causes such as browser plugin watchdogs, need for administration privileges, JRE bugs etc. etc.

It turns out the problem was caused due to a breakdown in the heartbeat messages sent between the browser VM and client VM.  Invoking the browser with the environment variable JPI_PLUGIN2_NO_HEARTBEAT=1 enabled the debugging to proceed as intended without the applet/Java-plugin being killed / terminating.

Below are the steps I performed to successfully debug an applet:

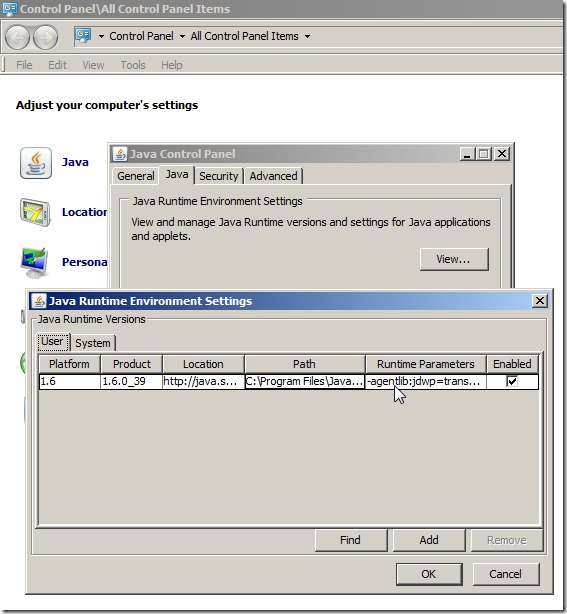
From Windows Control Panel choose Java > "Java" tab > "View..." button for Java Runtime Environment Settings
Double click table column value for Runtime Parameters for the user JRE entry.

Set the value as
-agentlib:jdwp=transport=dt_socket,server=y,address=8453,suspend=n

click "OK"
Click "Apply" on the Java Runtime Environment Settings page
Click "OK" on the Java Runtime Environment Settings page

jre
For debugging, the following advanced options should also be set for the JRE:

"Advanced" tab > Settings > Debugging
Enable tracing
Enable logging

"Advanced" tab > Settings > Java console
Choose Show console

Having configured the JRE options, we now need to disable that heartbeat message mechanism before we launch the browser.  As mentioned above, failure to perform this will result in the Applet / JRE abnormally terminating typically under a minute or so of stepping in to code.
You will likely see an exception along the lines of
basic: JVM[id=0]-Heartbeat heartbeat dead, exception. dT=NNN seconds.

From command-prompt
set JPI_PLUGIN2_NO_HEARTBEAT=1

And then launch browser, e.g.

%LOCALAPPDATA%\Google\Chrome\Application\chrome.exe --disable-hang-monitor

e.g. C:\Users\mshannon\AppData\Local\Google\Chrome\Application\chrome.exe --disable-hang-monitor

The "--disable-hang-monitor" option passed to Chrome prevents it from popping up the ‘plugin not responding’ dialog.

image

Additional command-line options for Browser JVM Troubleshooting can also be set; These result in verbose console messages such as rendering the parameters supplied to the applet.

set JPI_PLUGIN2_DEBUG=1
set JPI_PLUGIN2_VERBOSE=1

Check for JRE logs/traces in %USERPROFILE%\AppData\LocalLow\Sun\Java\Deployment\log

e.g. C:\Users\mshannon\AppData\LocalLow\Sun\Java\Deployment\log

Once I was able to properly step through code, I found the cause of the problem with our applet.  The applet was no longer able to obtain from the browser an OAM 11g webgate cookie which had been set to be httponly.

Simple Solution - Black Wallpaper Background in Android

I’ve just got hold of an Android Samsung Galaxy S2 phone, and I want a fixed background color, in particular black.  Why does Google make this so difficult.

Here is my solution that involves installing nil/zero android apps that took less than a minute.

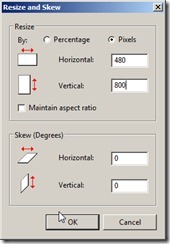
Step 1. Go to GSMARENA.COM and lookup the Display size resolution for your phone.  For the galaxy S2, it is 480 x 800 pixels.

Step 2. Fire up a basic paint application, such as Windows paint.

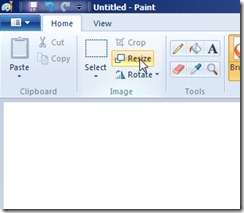
Step 3. Resize the image to the resolution from above

Step 4. Choose the appropriate color you want for the wallpaper/background, and leverage the fill/bucket tool to fill the image

Step 5. Save the image as a GIF, JPG, or PNG

Step 6. Email the image to your gmail account accessible from your android phone

Step 7.Open Gmail application and the email containing image just sent

Step 8. Click Save and View on Image

Step 9. Press Menu button in Viewer, and Choose “Set as” option and Home screen wallpaper or Lock screen wallpaper etc.

Step 10. Choose the correct orientation for the image – portrait etc, and click Save.

Congratulation, you should now have a fixed background.

Snap1Snap2Snap3Snap4

If you have a 480x800 phone, you can probably just save the image linked below.

black